Editing Jobs & Priorities
Once a job is added to the queue, BRC v3 provides a powerful Edit Mode that allows you to customize render parameters on a per-job basis. This system is designed to be non-destructive, meaning any changes you make here will never modify your original Blender file.
Accessing Edit Mode
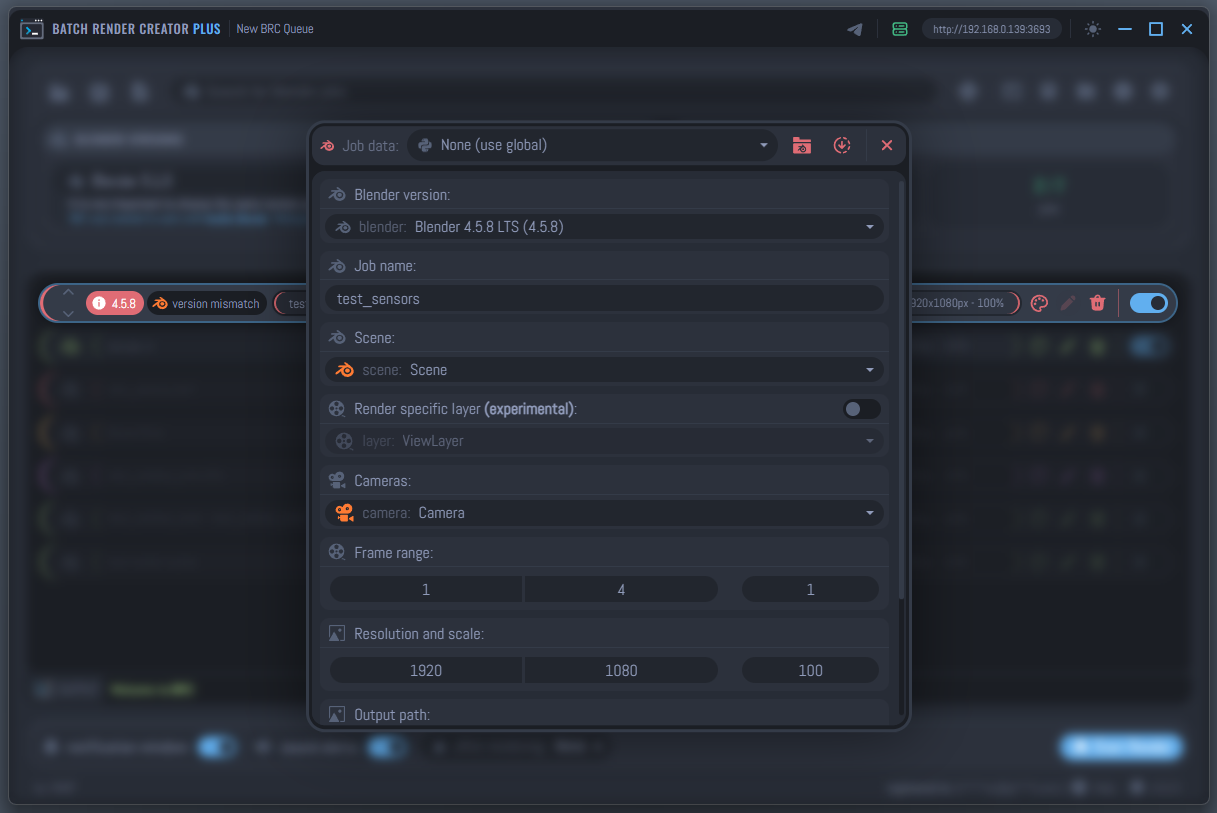
To edit a job, click the Edit (Pencil Icon) on any project item in the list, or simply double-click the item. This will open the customization window where you can fine-tune your render settings.
Customization Options
Custom Blender Version
This feature is only available in the Plus Version.
Assign a specific custom Blender installation to individual jobs. BRC will automatically use this version to render the job, allowing you to seamlessly render projects created in different Blender versions in the same queue without compatibility warnings.
- None (Use default): Uses the global Blender version configured in the BRC Settings.
- Custom Select: Choose any alternative Blender version you have registered in the Blender Version section.
Python Script Overrides
This feature is only available in the Plus Version.
At the very top of the edit window, you can select a custom Python Script to run during the render process. This allows for advanced automation, such as changing material properties, moving objects, or triggering external notifications.
- None (no script): Uses BRC's default optimization logic.
- Custom Select: Choose from scripts created in the Python Scripts manager.
Metadata
- Job Name: Rename the entry in your queue for better organization without changing the source filename.
Scene & View Layers
- Scene Selection: Choose which scene within the
.blendfile should be rendered.
Switching scenes is available for Plus users or when jobs are submitted via the Blender Addon.
- Render Specific Layer: Enable this to render only a specific View Layer. This is an experimental feature that helps isolate parts of your scene. [Plus Only]
Camera Selection
Select any camera defined in your Blender scene. If the scene has multiple cameras (e.g., Close-up, Wide, Top-down), you can add the same file multiple times to the queue and assign a different camera to each entry.
Frame Range & Step
- Start / End: Define the specific range of frames to render.
- Step: Skip frames (e.g., a step of 2 renders every other frame).
- Conflict Detection: BRC v3 monitors your queue in real-time. If you set a frame range that overlaps with another job targeting the same output folder, a warning will appear to prevent accidental file overwriting.
Resolution & Scaling
Resolution overrides are only available in the Plus Version or via the Blender Addon.
You can override the resolution of your render without opening Blender:
- Resolution X / Y: Manually set the pixel dimensions.
- Scale %: Quickly downscale (e.g., 50%) for fast previews or upscale for final high-res delivery.
Output Path
Choose where the final frames will be saved. BRC supports:
- Absolute Paths: Local or network drives.
- Blender Relative Paths: Paths starting with
//are automatically resolved relative to the.blendfile location.
Technical Note: Runtime Overrides
It is important to understand that BRC v3 applies these settings using Command Line Arguments at the exact moment the render starts.
When you click "Render", BRC tells Blender: "Open this file, BUT ignore its internal resolution and use 1920x1080 instead, and render only frames 1 to 50."
This approach ensures that:
- Your original
.blendfile remains untouched and safe. - You can have multiple jobs in the queue using the same file with different settings.
- Changes are applied instantly without needing to re-save the Blender project.
Duplicating Jobs
By default, BRC v3 prevents adding the exact same .blend file/scene combination twice directly to avoid accidental duplicates. However, you may often need to render the same scene multiple times with different cameras, frame ranges, or resolutions.
To achieve this, use the Duplication feature:
- Right-click on any job item in the list to open the Context Menu.
- Select ** Duplicate Job**.
- A new entry will appear in the queue with the exact same settings as the original.
- Enter Edit Mode on the new item to apply your different overrides.
When duplicating a job, it is highly recommended to immediately set a different Frame Range or Output Path. This ensures that the duplicated task does not overwrite the render results of the original version.
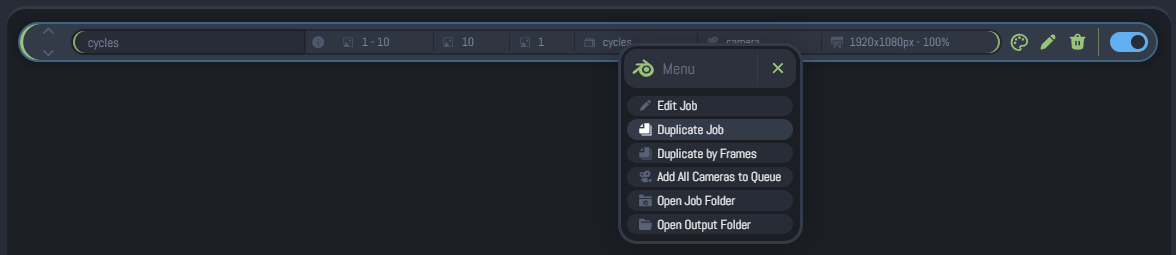
For a full list of actions available in the right-click menu, see the Context Menu guide.
Duplicate By Frames (New in v3.3.3)
Version 3.3.3 adds a faster way to split one existing job into multiple frame-specific jobs directly from the job list. This is especially useful when you want to render selected frames, break an animation into smaller chunks, or send different frame groups through the queue without manually duplicating and editing each job one by one.
This feature is only available in the Plus Version.
To use it:
- Right-click a job in the render queue to open its Context Menu.
- Click ** Duplicate by Frames**.
- BRC expands a compact input panel inside the context menu.
- Enter one or more frames and/or frame ranges.
- Click Duplicate by Frames to generate the new jobs.
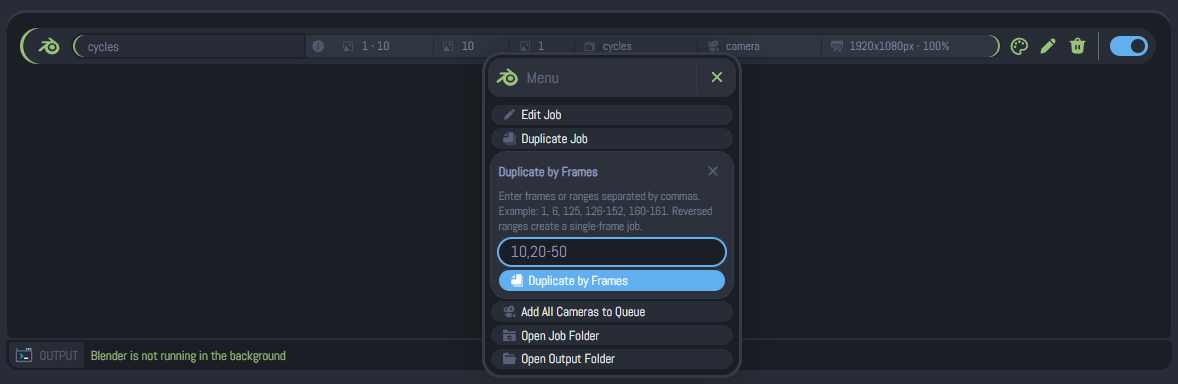
How the Input Works
The field accepts a comma-separated list of entries. Each entry can be either:
- A single frame, such as
1,6, or125 - A frame range, such as
126-152 - A mixed list, such as
1,6,125,126-152,160-161
In the mixed example above, BRC creates five duplicated jobs:
- one job for frame
1 - one job for frame
6 - one job for frame
125 - one job for range
126-152 - one job for range
160-161
Each generated job inherits the original job settings, including output path, camera, scene-related options, Python script selection, and other overrides. The only values automatically replaced are:
- Start Frame
- End Frame
- Step, which is reset to
1for the generated frame jobs
Accepted Characters and Auto-Cleaning
The input is sanitized in real time while you type. Only the following characters are accepted:
- numbers:
0-9 - comma:
, - hyphen:
-
Important input rules:
- Typing a period
.automatically converts it into a comma, - Letters and other unsupported characters are removed automatically
- Repeated commas are ignored
- A comma cannot be placed immediately after another comma or after a hyphen
- A range can contain only one hyphen
This means the field is designed to help you keep the format valid as you type, instead of waiting until the end to report formatting errors.
Valid Entry Examples
Use formats like these:
1010,20,301-241,6,125,126-152,160-161
Practical examples:
10creates one duplicated job that renders only frame1010,20,30creates three single-frame jobs100-150creates one duplicated job that renders from frame100to1501,5,10-20creates three duplicated jobs: frame1, frame5, and range10-20
Reversed Ranges
If you enter a reversed range such as 20-10, BRC does not create a descending range. Instead, it converts that entry into a single-frame job using the first number.
Examples:
20-10becomes a job for frame20150-120becomes a job for frame150
When this happens, BRC also shows a warning message so you can review the generated jobs.
Duplicate Handling
If the same single frame or the same exact range is entered more than once, BRC avoids creating duplicate copies of that exact target.
For example:
10,10,10creates only one frame-10job50-60,50-60creates only one range job for50-60
Best Use Cases
Duplicate by Frames is ideal when you want to:
- render only specific problem frames for testing
- split a long animation into smaller queue items
- isolate approval frames before a full final render
- create quick recovery jobs without editing the original queue item manually
The generated jobs keep the original output destination. If multiple frame jobs target the same folder, make sure the frame ranges do not unintentionally overlap. If needed, adjust the output path or review BRC's conflict warnings before rendering.
Defining Priorities
The order of the list from top to bottom is the order in which BRC will process the renders.
Reordering Methods:
- Click and Drag: Simply click on a job in the queue and drag it up or down to visually reposition it to your desired priority.
- Arrow Buttons: Select a job in the queue to reveal the Up and Down arrows on the left side of the card. Click these to shift the job's position in the render list.
- Keyboard Shortcuts:
CTRL + Arrow UP: Move the selected job one position up.CTRL + Arrow DOWN: Move the selected job one position down.
Reordering the queue is only permitted when no render is currently active. If you need to change the priorities, ensure the render queue is stopped first.
Utility Actions
Inside the Edit Mode header, you will find several quick-action buttons:
- ** Open Job Folder**: Instantly opens your system's file explorer (Windows Explorer or Linux Files) at the location of the selected
.blendfile. - ** Reload Job Data**: Forces BRC v3 to re-examine the Blender file. This is useful if you have made changes directly in Blender (like adding a new camera or scene) while the file was already in the queue.
Clicking Reload Job Data will reset all BRC overrides (Frame Range, Resolution, Camera) back to the values currently defined inside the .blend file.
Real-time Saving
BRC v3 utilizes a fully reactive architecture. Unlike traditional software, there is no "Save" or "Apply" button inside the edit window.
- Instant Updates: Every change you make to a slider, input field, or dropdown is applied to the queue in real-time.
- Closing the Window: Simply click the Close (X icon) in the top right or click anywhere outside the edit window when you are finished. Your settings are already active.