Installation Guide
BRC v3 currently supports Windows and Linux. To set up your environment, you will need to install the standalone application and the Blender addon bridge.
:::warning[ONLY DOWNLOAD FROM GUMROAD!] Batch Render Creator is a tool that has been developed by Wanderson Magalhaes since 2020, and Gumroad is its only official download source.
Be wary of any other site that is releasing this software for download.
The official BRC download site is: blender-addons.gumroad.com/l/batch_render_creator :::
What should I download?
When you visit the Gumroad store, you will see several files. Here is a guide on which one to choose based on your system and version:
For Windows Users
..._windows_installer.msi: The recommended choice. A standard installer that adds BRC v3 to your Start Menu and manages dependencies...._portable.exe: A standalone executable. No installation is required, just download and run. Perfect for using on different workstations from a USB drive.
For Linux Users
We provide three formats to ensure compatibility across distributions:
..._LINUX_DEB.deb: For Debian-based systems like Ubuntu, Mint, and Pop!_OS...._LINUX_RPM.rpm: For RHEL-based systems like Fedora, CentOS, and Rocky Linux...._LINUX_APPIMAGE.AppImage: A universal format. It works on almost any distribution. Just grant execution permissions and run.
Activating BRC v3 PLUS
If you purchased the PLUS or Supporters version, you will receive a License Key (Serial) via email and on your Gumroad library page.

Follow these steps to activate your license:
- Launch BRC v3: Open the application.
- Activation Window: The activation window will appear automatically if you are not yet activated.
- Terms of Use: Read the Terms of Use carefully, scroll to the very bottom, and click Accept.
- Enter Credentials: Fill in the Email used for the purchase and your License Key.
- Activate: Click Activate. The license will be bound to your current computer (Machine ID).
- Success: Once validated, all PLUS features will be unlocked permanently.
The FREE version does not require a license key. The first 7 days act as a full trial, after which it automatically transitions to the basic free mode.
1. Blender Addon Installation
Starting from version 3.2.2, the Blender Addon Bridge is directly embedded and distributed within the BRC v3 application. There is no need to download separate zip files from Gumroad!
How to Install the Addon
- Open the BRC v3 application and go to the Settings page.
- Ensure you have selected a default Blender Installation from the list.
- Under the Blender Version section, locate the addon status indicator and click the Install Addon button.
- The application will automatically extract and install the correct version of the bridge to your Blender's extensions folder.
- After installing, to view the add-on, be sure to close all open Blender instances first. In case it didn't become visible automatically, you can manually enable the addon via Edit > Preferences > Add-ons.
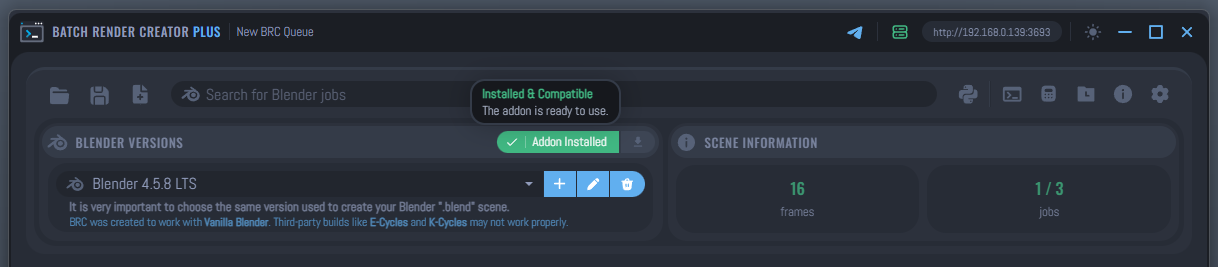
Addon Status & Version Compatibility
The settings page continuously monitors the current status of the addon inside Blender compared to the version bundled in the BRC app.
- Outdated but Supported: If the installed addon version is older than the bundled version but shares the same Database Schema (meaning there are no structural changes to how data is transferred), the addon will continue to work perfectly. You will see an option to update, but it is not mandatory to do it immediately.
- Unsupported (Update Required): If the installed addon has an outdated Database Schema, it will no longer be compatible with the current version of the BRC app. You must click the Update button to ensure your renders are submitted correctly without data corruption.
Want to learn more about how the bridge works? Check the Blender Addon Bridge Guide to explore all its functionalities and tools in detail.
2. Windows Installation
- Run the
.msiinstaller. - Follow the setup wizard instructions.
- Launch BRC v3 from your Desktop or Start Menu.
3. Linux Installation
Using .deb or .rpm
Install using your system's package manager:
# For Debian/Ubuntu
sudo dpkg -i batch_render_creator_v3_..._DEB.deb

# For Fedora/RPM
sudo rpm -i batch_render_creator_v3_..._RPM.rpm
Using AppImage
- Right-click the
.AppImagefile. - Go to Properties > Permissions.
- Enable Allow executing file as program.
- Double-click the file to launch.
4. Importing Previous Settings (v3.2.2+)

Starting from version 3.2.2, BRC includes a smart Previous Settings Import Assistant.
If you are a first-time user of the new version but have used older versions of BRC v3 in the past, the application will automatically detect your compatible previous installations. It will identify the most recent database and offer a modern, step-by-step import flow directly in the Settings window.
This assistant allows you to seamlessly migrate:
- Compatible General Settings (themes, preferences, behaviors)
- Blender Installations (registered paths and custom names)
- Network Server Data (approved users and IP configurations)
- Telegram Bot Configuration (bot tokens and chat IDs)
This means you don't have to reconfigure your entire environment after upgrading to a newer version!
Next Steps
Congratulations! You have successfully installed Batch Render Creator v3. Now that the software is ready, the next step is to configure it to match your hardware and rendering workflow.
- Configure BRC v3 Settings: Learn how to set up Blender paths, auto-recovery, network server, and customize notifications.